23 Ways to Speed up XP
1.) To decrease a system’s boot time and increase system performance, use the money you save by not buying defragmentation software — the built-in Windows defragmenter works just fine — and instead equip the computer with an Ultra-133 or Serial ATA hard drive with 8-MB cache buffer.
2.) If a PC has less than 512 MB of RAM, add more memory. This is a relatively inexpensive and easy upgrade that can dramatically improve system performance.
3.) Ensure that Windows XP is utilizing the NTFS file system. If you’re not sure, here’s how to check: First, double-click the My Computer icon, right-click on the C: Drive, then select Properties. Next, examine the File System type; if it says FAT32, then back-up any important data. Next, click Start, click Run, type CMD, and then click OK. At the prompt, type CONVERT C: /FS:NTFS and press the Enter key. This process may take a while; it’s important that the computer be uninterrupted and virus-free. The file system used by the bootable drive will be either FAT32 or NTFS. I highly recommend NTFS for its superior security, reliability, and efficiency with larger disk drives.
4.) Disable file indexing. The indexing service extracts information from documents and other files on the hard drive and creates a “searchable keyword index.” As you can imagine, this process can be quite taxing on any system.
The idea is that the user can search for a word, phrase, or property inside a document, should they have hundreds or thousands of documents and not know the file name of the document they want. Windows XP’s built-in search functionality can still perform these kinds of searches without the Indexing service. It just takes longer. The OS has to open each file at the time of the request to help find what the user is looking for.
Most people never need this feature of search. Those who do are typically in a large corporate environment where thousands of documents are located on at least one server. But if you’re a typical system builder, most of your clients are small and medium businesses. And if your clients have no need for this search feature, I recommend disabling it.
Here’s how: First, double-click the My Computer icon. Next, right-click on the C: Drive, then select Properties. Uncheck “Allow Indexing Service to index this disk for fast file searching.” Next, apply changes to “C: subfolders and files,” and click OK. If a warning or error message appears (such as “Access is denied”), click the Ignore All button.
5.) Update the PC’s video and motherboard chipset drivers. Also, update and configure the BIOS. For more information on how to configure your BIOS properly, see this article on my site.
6.) Empty the Windows Prefetch folder every three months or so. Windows XP can “prefetch” portions of data and applications that are used frequently. This makes processes appear to load faster when called upon by the user. That’s fine. But over time, the prefetch folder may become overloaded with references to files and applications no longer in use. When that happens, Windows XP is wasting time, and slowing system performance, by pre-loading them. Nothing critical is in this folder, and the entire contents are safe to delete.
7.) Once a month, run a disk cleanup. Here’s how: Double-click the My Computer icon. Then right-click on the C: drive and select Properties. Click the Disk Cleanup button — it’s just to the right of the Capacity pie graph — and delete all temporary files.
8.) In your Device Manager, double-click on the IDE ATA/ATAPI Controllers device, and ensure that DMA is enabled for each drive you have connected to the Primary and Secondary controller. Do this by double-clicking on Primary IDE Channel. Then click the Advanced Settings tab. Ensure the Transfer Mode is set to “DMA if available” for both Device 0 and Device 1. Then repeat this process with the Secondary IDE Channel.
9.) Upgrade the cabling. As hard-drive technology improves, the cabling requirements to achieve these performance boosts have become more stringent. Be sure to use 80-wire Ultra-133 cables on all of your IDE devices with the connectors properly assigned to the matching Master/Slave/Motherboard sockets. A single device must be at the end of the cable; connecting a single drive to the middle connector on a ribbon cable will cause signaling problems. With Ultra DMA hard drives, these signaling problems will prevent the drive from performing at its maximum potential. Also, because these cables inherently support “cable select,” the location of each drive on the cable is important. For these reasons, the cable is designed so drive positioning is explicitly clear.
10.) Remove all spyware from the computer. Use free programs such as AdAware by Lavasoft or SpyBot Search & Destroy. Once these programs are installed, be sure to check for and download any updates before starting your search. Anything either program finds can be safely removed. Any free software that requires spyware to run will no longer function once the spyware portion has been removed; if your customer really wants the program even though it contains spyware, simply reinstall it. For more information on removing Spyware visit this Web Pro News page.
11.) Remove any unnecessary programs and/or items from Windows Startup routine using the MSCONFIG utility. Here’s how: First, click Start, click Run, type MSCONFIG, and click OK. Click the StartUp tab, then uncheck any items you don’t want to start when Windows starts. Unsure what some items are? Visit the WinTasks Process Library. It contains known system processes, applications, as well as spyware references and explanations. Or quickly identify them by searching for the filenames using Google or another Web search engine.
12.) Remove any unnecessary or unused programs from the Add/Remove Programs section of the Control Panel.
13.) Turn off any and all unnecessary animations, and disable active desktop. In fact, for optimal performance, turn off all animations. Windows XP offers many different settings in this area. Here’s how to do it: First click on the System icon in the Control Panel. Next, click on the Advanced tab. Select the Settings button located under Performance. Feel free to play around with the options offered here, as nothing you can change will alter the reliability of the computer — only its responsiveness.
14.) If your customer is an advanced user who is comfortable editing their registry, try some of the performance registry tweaks offered at Tweak XP.
15.) Visit Microsoft’s Windows update site regularly, and download all updates labeled Critical. Download any optional updates at your discretion.
16.) Update the customer’s anti-virus software on a weekly, even daily, basis. Make sure they have only one anti-virus software package installed. Mixing anti-virus software is a sure way to spell disaster for performance and reliability.
17.) Make sure the customer has fewer than 500 type fonts installed on their computer. The more fonts they have, the slower the system will become. While Windows XP handles fonts much more efficiently than did the previous versions of Windows, too many fonts — that is, anything over 500 — will noticeably tax the system.
18.) Do not partition the hard drive. Windows XP’s NTFS file system runs more efficiently on one large partition. The data is no safer on a separate partition, and a reformat is never necessary to reinstall an operating system. The same excuses people offer for using partitions apply to using a folder instead. For example, instead of putting all your data on the D: drive, put it in a folder called “D drive.” You’ll achieve the same organizational benefits that a separate partition offers, but without the degradation in system performance. Also, your free space won’t be limited by the size of the partition; instead, it will be limited by the size of the entire hard drive. This means you won’t need to resize any partitions, ever. That task can be time-consuming and also can result in lost data.
19.) Check the system’s RAM to ensure it is operating properly. I recommend using a free program called MemTest86. The download will make a bootable CD or diskette (your choice), which will run 10 extensive tests on the PC’s memory automatically after you boot to the disk you created. Allow all tests to run until at least three passes of the 10 tests are completed. If the program encounters any errors, turn off and unplug the computer, remove a stick of memory (assuming you have more than one), and run the test again. Remember, bad memory cannot be repaired, but only replaced.
20.) If the PC has a CD or DVD recorder, check the drive manufacturer’s Web site for updated firmware. In some cases you’ll be able to upgrade the recorder to a faster speed. Best of all, it’s free.
21.) Disable unnecessary services. Windows XP loads a lot of services that your customer most likely does not need. To determine which services you can disable for your client, visit the Black Viper site for Windows XP configurations.
22.) If you’re sick of a single Windows Explorer window crashing and then taking the rest of your OS down with it, then follow this tip: open My Computer, click on Tools, then Folder Options. Now click on the View tab. Scroll down to “Launch folder windows in a separate process,” and enable this option. You’ll have to reboot your machine for this option to take effect.
23.) At least once a year, open the computer’s cases and blow out all the dust and debris. While you’re in there, check that all the fans are turning properly. Also inspect the motherboard capacitors for bulging or leaks.

4/30/09
Restart Windows without restarting the Computer
When you click on the SHUTDOWN button, make sure to simultaneous press SHIFT Button. If you hold the Shift key down while clicking on SHUTDOWN button, you computer would restart without restarting the Computer. This is equivalent to term "HOT REBOOT".
Flash advantages and disadvantages
Flash advantages:
High quality.
Include the playback controls. (SWF only)
Satisfying file size.
Both PC and Mac accept the flash player as the browser plug-in.
Easy to stream over the internet.
Flash disadvantages:
SWF has the limit for 16000 frames.
FLV can not contain the player controls.
High quality.
Include the playback controls. (SWF only)
Satisfying file size.
Both PC and Mac accept the flash player as the browser plug-in.
Easy to stream over the internet.
Flash disadvantages:
SWF has the limit for 16000 frames.
FLV can not contain the player controls.
Make things beter in youtube...
add this after the url &fmt=18
eg
www.youtube.com/watch?v=????&fmt=18
hit enter
This worked for me
eg
www.youtube.com/watch?v=????&fmt=18
hit enter
This worked for me
Learn Microsoft Windows Shortcut Keys
Microsoft Windows SHORTCUT KEYS.
This makes work easier, enjoy
This makes work easier, enjoy
- ANSI.SYS Defines functions that change display graphics, control cursor movement, and reassign keys.
- APPEND Causes MS-DOS to look in other directories when editing a file or running a command.
- ARP Displays, adds, and removes arp information from network devices.
- ASSIGN Assign a drive letter to an alternate letter.
- ASSOC View the file associations.
- AT Schedule a time to execute commands or programs.
- ATMADM Lists connections and addresses seen by Windows ATM call manager.
- ATTRIB Display and change file attributes.
- BATCH Recovery console command that executes a series of commands in a file.
- BOOTCFG Recovery console command that allows a user to view, modify, and rebuild the boot.ini
- BREAK Enable / disable CTRL + C feature.
- CACLS View and modify file ACL's.
- CALL Calls a batch file from another batch file.
- CD Changes directories.
- CHCP Supplement the International keyboard and character set information.
- CHDIR Changes directories.
- CHKDSK Check the hard disk drive running FAT for errors.
- CHKNTFS Check the hard disk drive running NTFS for errors.
- CHOICE Specify a listing of multiple options within a batch file.
- CLS Clears the screen.
- CMD Opens the command interpreter.
- COLOR Easily change the foreground and background color of the MS-DOS window.
- COMP Compares files.
- COMPACT Compresses and uncompress files.
- CONTROL Open control panel icons from the MS-DOS prompt.
- CONVERT Convert FAT to NTFS.
- COPY Copy one or more files to an alternate location.
- CTTY Change the computers input/output devices.
- DATE View or change the systems date.
- DEBUG Debug utility to create assembly programs to modify hardware settings.
- DEFRAG Re-arrange the hard disk drive to help with loading programs.
- DEL Deletes one or more files.
- DELETE Recovery console command that deletes a file.
- DELTREE Deletes one or more files and/or directories.
- DIR List the contents of one or more directory.
- DISABLE Recovery console command that disables Windows system services or drivers.
- DISKCOMP Compare a disk with another disk.
- DISKCOPY Copy the contents of one disk and place them on another disk.
- DOSKEY Command to view and execute commands that have been run in the past.
- DOSSHELL A GUI to help with early MS-DOS users.
- DRIVPARM Enables overwrite of original device drivers.
- ECHO Displays messages and enables and disables echo.
- EDIT View and edit files.
- EDLIN View and edit files.
- EMM386 Load extended Memory Manager.
- ENABLE Recovery console command to enable a disable service or driver.
- ENDLOCAL Stops the localization of the environment changes enabled by the setlocal command.
- ERASE Erase files from computer.
- EXIT Exit from the command interpreter.
- EXPAND Expand a M*cros*ft Windows file back to it's original format.
- EXTRACT Extract files from the M*cros*ft Windows cabinets.
- FASTHELP Displays a listing of MS-DOS commands and information about them.
- FC Compare files.
- FDISK Utility used to create partitions on the hard disk drive.
- FIND Search for text within a file.
- FINDSTR Searches for a string of text within a file.
- FIXBOOT Writes a new boot sector.
- FIXMBR Writes a new boot record to a disk drive.
- FOR Boolean used in batch files.
- FORMAT Command to erase and prepare a disk drive.
- FTP Command to connect and operate on a FTP server.
- FTYPE Displays or modifies file types used in file extension associations.
- GOTO Moves a batch file to a specific label or location.
- GRAFTABL Show extended characters in graphics mode.
- HELP Display a listing of commands and brief explanation.
- IF Allows for batch files to perform conditional processing.
- IFSHLP.SYS 32-bit file manager.
- IPCONFIG Network command to view network adapter settings and assigned values.
- KEYB Change layout of keyboard.
- LABEL Change the label of a disk drive.
- LH Load a device driver in to high memory.
- LISTSVC Recovery console command that displays the services and drivers.
- LOADFIX Load a program above the first 64k.
- LOADHIGH Load a device driver in to high memory.
- LOCK Lock the hard disk drive.
- LOGON Recovery console command to list installations and enable administrator login.
- MAP Displays the device name of a drive.
- MD Command to create a new directory.
- MEM Display memory on system.
- MKDIR Command to create a new directory.
- MODE Modify the port or display settings.
- MORE Display one page at a time.
- MOVE Move one or more files from one directory to another directory.
- MSAV Early M*cros*ft Virus scanner.
- MSD Diagnostics utility.
- MSCDEX Utility used to load and provide access to the CD-ROM.
- NBTSTAT Displays protocol statistics and current TCP/IP connections using NBT
- NET Update, fix, or view the network or network settings
- NETSH Configure dynamic and static network information from MS-DOS.
- NETSTAT Display the TCP/IP network protocol statistics and information.
- NLSFUNC Load country specific information.
- NSLOOKUP Look up an IP address of a domain or host on a network.
- PATH View and modify the computers path location.
- PATHPING View and locate locations of network latency.
- PAUSE Command used in batch files to stop the processing of a command.
- PING Test / send information to another network computer or network device.
- POPD Changes to the directory or network path stored by the pushd command.
- POWER Conserve power with computer portables.
- PRINT Prints data to a printer port.
- PROMPT View and change the MS-DOS prompt.
- PUSHD Stores a directory or network path in memory so it can be returned to at any time.
- QBASIC Open the QBasic.
- RD Removes an empty directory.
- REN Renames a file or directory.
- RENAME Renames a file or directory.
- RMDIR Removes an empty directory.
- ROUTE View and configure windows network route tables.
- RUNAS Enables a user to execute a program on another computer.
- SCANDISK Run the scandisk utility.
- SCANREG Scan registry and recover registry from errors.
- SET Change one variable or string to another.
- SETLOCAL Enables local environments to be changed without affecting anything else.
- SETVER Change MS-DOS version to trick older MS-DOS programs.
- SHARE Installs support for file sharing and locking capabilities.
- SHIFT Changes the position of replaceable parameters in a batch program.
- SHUTDOWN Shutdown the computer from the MS-DOS prompt.
- SMARTDRV Create a disk cache in conventional memory or extended memory.
- SORT Sorts the input and displays the output to the screen.
- START Start a separate window in Windows from the MS-DOS prompt.
- SUBST Substitute a folder on your computer for another drive letter.
- SWITCHES Remove add functions from MS-DOS.
- SYS Transfer system files to disk drive.
- TELNET Telnet to another computer / device from the prompt.
- TIME View or modify the system time.
- TITLE Change the title of their MS-DOS window.
- TRACERT Visually view a network packets route across a network.
- TREE View a visual tree of the hard disk drive.
- TYPE Display the contents of a file.
- UNDELETE Undelete a file that has been deleted.
- UNFORMAT Unformat a hard disk drive.
- UNLOCK Unlock a disk drive.
- VER Display the version information.
- VERIFY Enables or disables the feature to determine if files have been written properly.
- VOL Displays the volume information about the designated drive.
- XCOPY Copy multiple files, directories, and/or drives from one location to another.
- TRUENAME When placed before a file, will display the whole directory in which it exists
- TASKKILL It allows you to kill those unneeded or locked up applications
Make Firefox 70% Faster ! (Easy Way)
1. Type "about:config" into the address bar and hit return. Scroll down and look for the following entries:
network.http.pipelining
network.http.proxy.pipelining
network.http.pipelining.maxrequests
Normally the browser will make one request to a web page at a time. When you enable pipelining it will make several at once, which really speeds up page loading.
2. Alter the entries as follows: (by double clicking them)
Set "network.http.pipelining" to "true"
Set "network.http.proxy.pipelining" to "true"
Set "network.http.pipelining.maxrequests" to some number like 30. This means it will make 30 requests at once. (I changed mine to 100, works great.)
3. Lastly right-click anywhere and select New-> Integer. Name it "nglayout.initialpaint.delay" and set its value to "0". This value is the amount of time the browser waits before it acts on information it recieves.
Enjoy
Copying a path to command prompt in vista
In Xp it is very easy to copy a path of a file to a command prompt window by just dragging the item directly onto the cmd window and you have the full path. However this technic is not available in vista. No need to worry there is a short cut to achieve this.
1) Just go to the file you want to copy the path. Position the cursor on the file you want to create the path, then Press shift and whilst you hold shift right click.
2) Click where it says "copy as path."
3) Go to the cmd window, right click and click paste and you are done.
I have not yet tried this in windows 7, I hope its the same.
How to convert F4V to AVI
Learn more about F4V:
F4V is a new type of FLV file. Compared with the traditional FLV, it owns better quality under the same situations. Thus many people regard this kind of FLV as HD FLV (High Definition FLV). Due to this feature, nowadays most of people think it a development trend for FLV file. Of course, the video-sharing web sites also accept this type of FLV to upload and download, especially YouTube.
F4V is encoded with H.264 video codec which is the reason for better video quality. Not all the FLV converters can process it successfully. Therefore, choosing a suitable program is very important. Otherwise, you will complain to buy a useless YouTube converter as this type of FLV can not be recognized by some FLV converters.
Why need AVI:
AVI video format is a typical and traditional container format which can be compatible with multiple video and audio streaming. It is famous as its outstanding video quality and its wide compatibilities. Generally speaking, people will convert other video format to AVI then input them into the editing software like Adobe Premiere, Windows Movie Maker, Sony Vegas and more. Moreover, most media players can play AVI.
How to convert F4V to AVI:
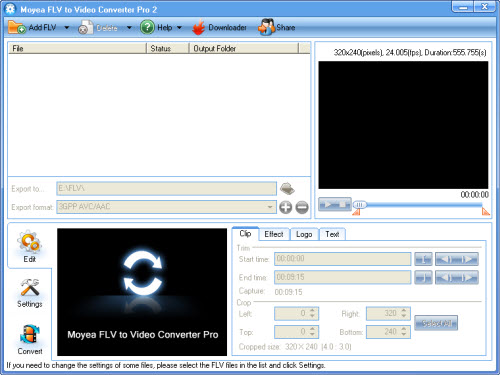
I recommend a program called Moyea FLV to Video Converter Pro 2. It can be compatible with all types of FLV including F4V. You can get the desired output video formats like AVI, MPEG, MP4, MP3, WMV, MOV, 3GP, VOB and FLV with this powerful conversion tool. In addition, it provides simple editing functions like trim and crop the video, add the image watermark and text watermark and adjust the video effects like brightness, contrast or volume.
The simple steps to convert F4V to AVI:
2. Click “Add FLV” button to input F4V files.
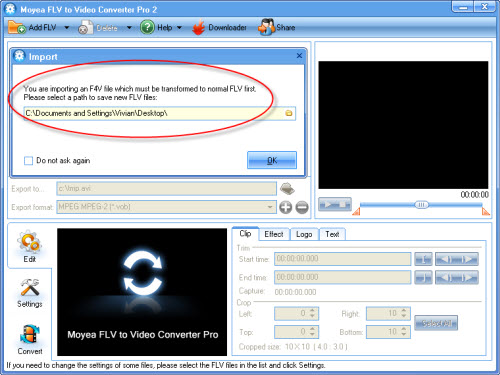
When you import F4V into the software, the program will pop up a window to tell you that the file you input is F4V and it needs converting to an FLV for conversion. Choose a path to save the FLV on your PC. Then the F4V files will be input successfully.
Set the output settings.


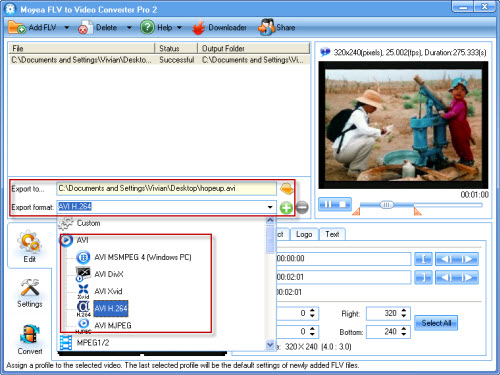
In “Export to…” box, configure the output path to save the files on your PC. Meanwhile select AVI as the output video format in “Export format” box.Edit the output files.
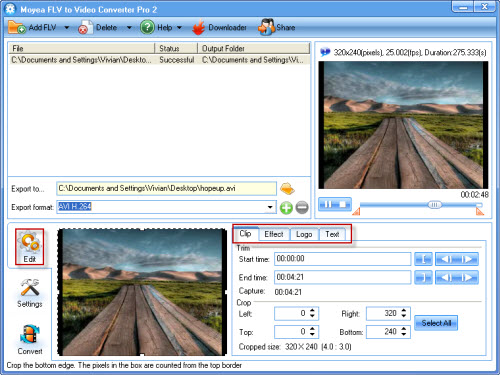
You can trim and crop the video, add image watermark and text watermark as well as adjust the video effects like brightness, contrast and so on.
- Convert F4V to AVI.
Click “Convert” tab and hit “Start” button. The conversion will be processed. After finishing the encoding AVI, you can find the output AVI in specified folder.

Now AVI file is ready. You can freely input them into your favorite editing software to make own videos. Do not forget, you can use the adding-watermark function to protect your videos.
flash knowledges
As we know, Flash is the most suitable format to play animated video, particularly over the internet. This is mainly because the Flash player plug-in is used widely and almost installed in all internet browsers like IE, Firefox, Safari, Opera, Chrome, etc. As a browser plug-in, it owns the advantage to be compatible with your PC or Macs.
The Flash files can stream to the users’ browser when embedded into a webpage. That indicates you do not have to download the entire video before viewing. The video begins playing when some parts have been downloaded.
Two types for Flash movies: SWF and FLV (Flash Video)
SWF includes the interactive objects like the playback button, process bar or some textboxes. However, this kind of Flash file has a limit for the frames. They can only contain 16000 frames. That means the movie length will be limited. Therefore it is not suitable for longer movies.
FLV (Flash Video) is just the video content. It doesn’t contain any playback controls. It can only be played in local PC if it is not embedded into a player. However, it has no limit for the movie length. So many people will adopt this method to play the movies online that the SWF file, namely the player calls the video content, FLV file.
How to : Detecting a USB drive virus/worm without opening the USB drive
Nowadays, most of the viruses/worms spread via USB drives. So, now if your USB drive is infected and if you double-click it to open it... BOOM the virus enters your drive. Unless your AntiVirus is updated till date, you don't have any means to identify whether there exists an infection in your USB drive. Even if your AntiVirus IS updated, chances are that the virus/worm is a new one and your AntiVirus doesn't have any record of it. So how do you decide whether your USB drive's infected or not without relying on your AntiVirus?? Read on...
1. Download/create/extract an icon (*.ico) file. One nice site for getting cool icons is : 2. Open notepad and write the following code in it :
where, "XXX" is your icon file's name.
3. Save it as "autorun.inf"
4. Copy the icon (from step 1) and the autorun file (from step 2) in your USB drive (assuming it is not infected).
5. Set their attributes to ReadOnly and Hidden so that you don't accidentally delete them.
6. Disconnect and reconnect your USB and check whether the icon appears or not. If it doesn't, the icon names in the code and of the file probably don't match or you haven't saved the code as a ".inf" file.
Now, when your USB gets infected, the icon will disappear (or will be changed). This is because for the virus/worm to spread itself into the hard drive, it has to create an "autorun.inf" file. This file modifies the existing one.. thus preventing the icon and telling you about the infection. So, now instead of double-clicking to open the drive, open it by View --> Explorer bar --> Folders option in the menu after scanning it. Also make sure to put the original autorun file back in the file.
Hope this helps.....
1. Download/create/extract an icon (*.ico) file. One nice site for getting cool icons is :
Code:
www.iconspedia.com Code:
[autorun]
icon=XXX.ico 3. Save it as "autorun.inf"
4. Copy the icon (from step 1) and the autorun file (from step 2) in your USB drive (assuming it is not infected).
5. Set their attributes to ReadOnly and Hidden so that you don't accidentally delete them.
6. Disconnect and reconnect your USB and check whether the icon appears or not. If it doesn't, the icon names in the code and of the file probably don't match or you haven't saved the code as a ".inf" file.
Now, when your USB gets infected, the icon will disappear (or will be changed). This is because for the virus/worm to spread itself into the hard drive, it has to create an "autorun.inf" file. This file modifies the existing one.. thus preventing the icon and telling you about the infection. So, now instead of double-clicking to open the drive, open it by View --> Explorer bar --> Folders option in the menu after scanning it. Also make sure to put the original autorun file back in the file.
Hope this helps.....
Lightbulb Rename Recycle bin
- Click Start / Run
- Type regedit and press enter.
- Open the HKEY_CLASSES_ROOT folder
- Open the CLSID folder
- Open the {645FF040-5081-101B-9F08-00AA002F954E} folder
- Open the ShellFolder folder
- Change the "Attributes" data value from "40 01 00 20" to "50 01 00 20". Once completed change the "CallForAttributes" dword value to "0x00000000" (double-click and change value data to 0). You must change both of these values to get the rename to appear.
Make ur PC Pentium 9!!!!!!!!!!!

This is just fake think this is not for real but i will learn you how to do this
go on start than go run write regedit and go here
HKEY_LOCAL_MACHINE - HARDWARE - DESCRIPTION - SYSTEM - CentralProcessor - and type this ProcessorNameString there is your name of pc change it how ever you like
Depositfiles Hack - No More "Wait 60 Seconds"!!!
Firstly, you need to be using a Firefox/Mozilla browser.
Copy the Depositfiles download URL and paste it on your Browsers Address Bar, press Enter..
Now click on "Free Downloading".
Next, as soon as the COUNTDOWN Begins...
goto your browsers menu bar and click on VIEW >>PAGE STYLE>> NO STYLE
Now the Download Button will appear... click on it and start downloading....
4/29/09

Windows Hot shortcut keys
Windows Hot shortcut keys
Shortcut keys Action
Win ....................... Press windows key to open start menu
Win+R ....................... Apply to open Run dialog box
Win+M ....................... Apply to minimize all opened windows
Win+Shift+M ....................... Apply to maximize all opened windows
Win+L ....................... Press keys to lock keyboard in windows XP
Win+E ....................... Press keys to open My Computer
Win+F ....................... Apply to open search options
Win+U ....................... Apply keys to open Utility Manager
Win+D ....................... To view desktop/minimize all windows
Win+F1 ....................... To view the detail windows help page
Win+Pause ....................... To view the System Properties dialog box
Win+Tab ....................... Move through taskbar programs
Win+F+Ctrl ....................... Apply to open search for computers
Alt+Tab ....................... Move through opened windows programs
Alt+F4 ....................... Press keys to close active windows program
Alt+Enter ....................... Apply to open properties of selected item
Alt+ SPACEBAR ....................... Open the system menu of active window
Alt+ SPACEBAR +N ....................... Press keys to minimize the active program
Alt+ SPACEBAR +R ....................... Press keys to restore the active program
Alt+ SPACEBAR+C ....................... Press keys to close the active program
Alt+ SPACEBAR+X ....................... Press keys to maximize the active program
Alt+ SPACEBAR+M ....................... Press keys to move the active program
Ctrl+Alt+Delete ....................... Apply to open windows task manager
Ctrl+Shift+Esc ....................... Apply to open windows task manager
Ctrl+Esc ....................... Press keys to open start menu
Shift ....................... Shift key to prevent CD from automatically playing
Shift+Delete ....................... To delete items permanently
Php 5 for dummies
- Covers the latest major release of PHP, the most popular open source Web scripting language, in the friendly, easy-to-understand For Dummies style
- PHP is installed on nearly nine million servers, and usage has grown at the rate of 6.5 percent per month for the past two years
- PHP is easy to learn, well suited for Web development, and can be embedded with HTML, making it a good choice for creating dynamic Web pages for e-commerce sites and other Web applications; a database-friendly language, it connects easily to Sybase, MySQL, mSQL, Oracle, and other databases
- Explains how to acquire and install PHP, how PHP’s features make it a useful scripting language, and how to use PHP for three of the most common applications: interactive Web sites, database storage, and common operating system tasks
http://rapidshare.com/files/28634083/PHP_5_for_Dummies.rar
Subscribe to:
Posts (Atom)